Pipeline
The Pipeline page visually represents the enforcement process within your account. It displays each seller's current stage and status and allows you to monitor seller activities efficiently. This guide provides detailed information on how the enforcement process works on the Pipeline page and how you can set up your enforcement process for sellers who violate the MAP policy and unauthorized sellers.
Creating and Deleting a Pipeline
To create a Pipeline:
Navigate to Pipeline > Create Pipeline, or
In the Pipeline Settings, click Create New Pipeline.
To delete a Pipeline
Navigate to Pipeline > Select a Pipeline.
At the upper right side of your screen, click Pipeline Settings.
Click Delete This Pipeline.
To confirm that you want to delete a Pipeline, you will need to enter the Pipeline name.
All Seller Filters
In the All Sellers section, you can filter sellers to display specific data from your Pipeline:
Filter Options: You can filter sellers by marketplace, product condition, price, seller groups, and fulfillment criteria.
Sorting Options: Sort sellers by active/inactive status, presence of price violations (with/without), or choose None.
Seller Categories
Active Sellers: Currently under investigation but not yet subjected to enforcement action.
Inactive Sellers: Sellers who have ceased selling products following enforcement action. If these sellers resume their activities, they will return to the same enforcement phase where they left off.
Violating MAP Price: Sellers selling or advertising products below MAP.
No Price Violation: Active sellers with no recorded price violations.
Pipeline Stages
A stage is a section in the pipeline that is associated with different types of notes and communications. When you move a seller to a specific stage, you can send a communication or log a note related to that stage.
In Brand Guarde, the enforcement process typically involves five stages:
Enforcement Stage 1: A one-page letter is sent to the seller, stating they have not received authorization from the brand to sell on online marketplaces.
Enforcement Stage 2: A detailed long-form letter with legal references to previous enforcement cases is sent.
Enforcement Stage 3: A letter outlining the case for willful trademark infringement and the potential for increased monetary damages is sent.
Email Responsive Stage: Sellers move to this stage if they respond to the email sent to them.
Escalated Account Stage: This stage involves external parties, often legal counsel, for handling specific sellers. It can be customized for different processes.
Important: These stages are fully customizable. You can create your own enforcement process to align with your specific business needs.

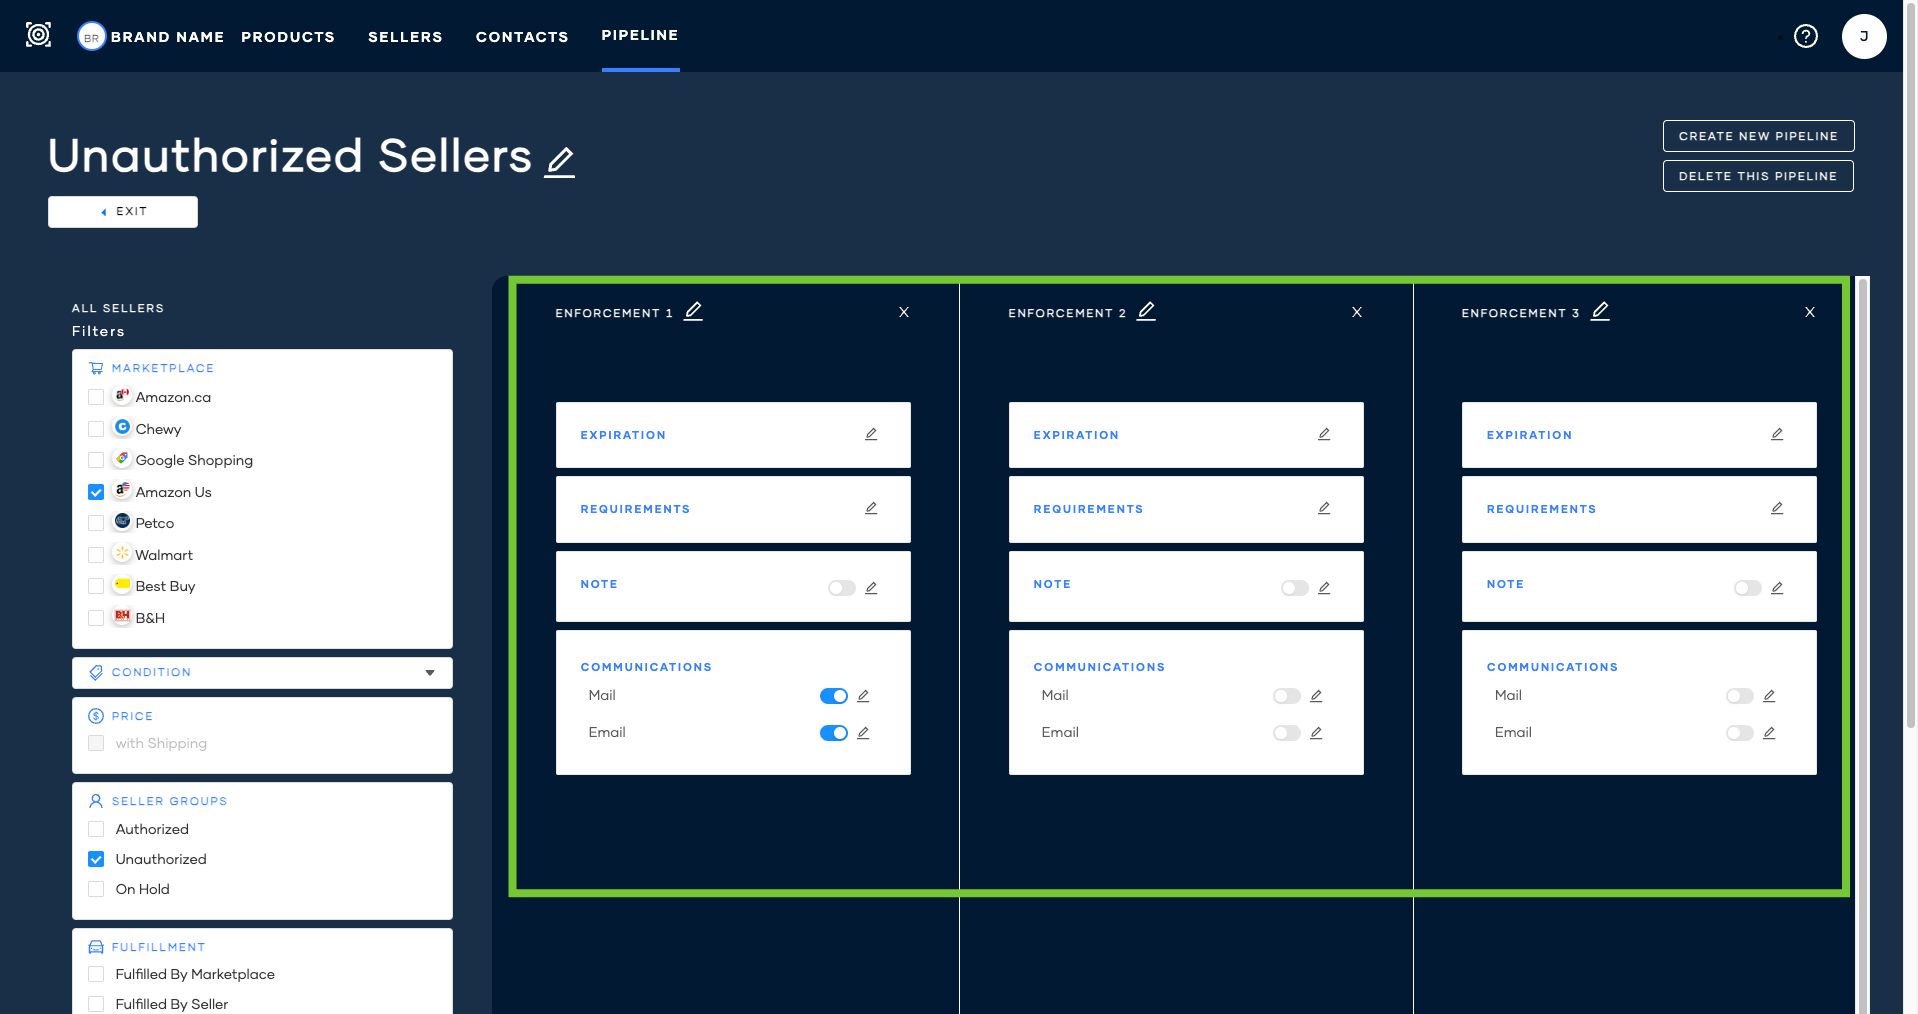
Configuring an enforcement stage
Each stage has four sections you can configure:
Expiration: Mark sellers as expired after a set period (e.g., 14 days, 30 days, 60 days) or on a specific date.
Requirements: Set conditions for moving sellers between stages and sending communications. For example, sellers can only move to the next stage if they’ve received an electronic cease and desist letter.
Notes: The system automatically creates notes and labels for sellers based on their stage in the enforcement process.
Communications: Turn the toggle on to activate two modes of communication, mail and email.
Mail: This involves sending a physical letter to the seller. Select mail delivery, printing, and provide the return address. You can also upload a letter template.
Email: This is an electronic mail sent to the seller. Upload attachments, enter recipients, and draft the email body.
Viewing Seller Activity
To review specific enforcement notes or the activity of a seller:
Click on the seller's name.
Open the Seller Profile.
In the Seller Profile, you can view the seller’s activity, notes, and contacts. For more information, see Seller Profile.
Additionally, if you select one or more sellers, you can navigate to other pages to view their product offerings and other relevant information. An icon beside the Seller ID indicates the number of notes each seller has.
Use Cases
Unauthorized Seller Enforcement
Scenario: You discover unauthorized sellers offering your products on various marketplaces. To stop them, you decide to create an enforcement setup.
Unauthorized Seller Enforcement Setup
Navigate to Pipeline > Create Pipeline.
Enter a name for your Pipeline.
Set the filters (e.g., marketplace, condition, price, seller groups, and fulfillment).
Check the Unauthorized box to filter unauthorized sellers.
Sort the sellers by Active/Inactive and Buybox.
Toggle the option to show the linked seller on/off.
Choose the pipeline label color.
Once satisfied with your configurations, click Done.

Adding a stage
Add a stage for your enforcement process. Typically, the enforcement process for unauthorized sellers includes:
Enforcement Stage 1
Enforcement Stage 2
Enforcement Stage 3
Email Responsive Stage
Escalated Account Stage
Configure the sections in each stage, such as expiration, requirements, notes, and communications.
Click Exit. The changes are saved automatically.
Manage unauthorized sellers
In the All Sellers action, drag and drop sellers into the desired stages.
Tick the box beside Active/Inactive to select all sellers underneath. To select an individual seller, tick the box beside the seller ID. This will open the bulk actions menu where you can:
Move stage
Jump to different pages
Export
Add shared notes
Set/reset expiration

MAP Enforcement
Scenario: You've discovered that some of your resellers are violating your MAP (Minimum Advertised Price) policy by advertising and selling products at prices below the MAP in your dashboard. To resolve this issue, you've decided to set up an enforcement process.
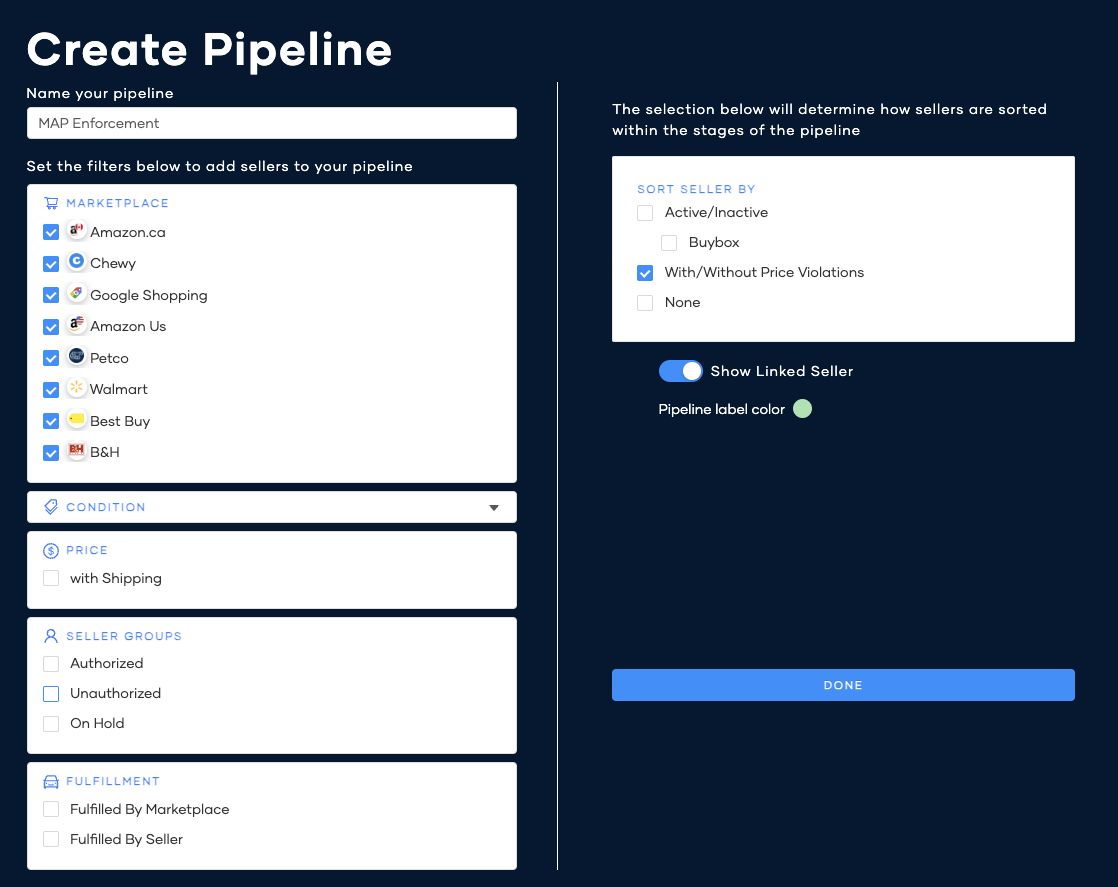
MAP Enforcement Setup
Navigate to Pipeline > Create Pipeline.
Enter a name for your Pipeline.
Set the filters (e.g., marketplace, condition, price, seller groups, and fulfillment).
Sort the sellers within the pipeline stages by With/Without Price Violations.
Toggle the option to show the linked seller on/off.
Choose the pipeline label color.
Once satisfied with your configurations, click Done.
Adding a stage
Add a stage for your enforcement process. Typically, the enforcement process for sellers violating MAP policy includes:
MAP Notice 1
MAP Notice 2
MAP Notice 3
Configure the sections in each stage, such as expiration, requirements, notes, and communications.
Click Exit. The changes are saved automatically.
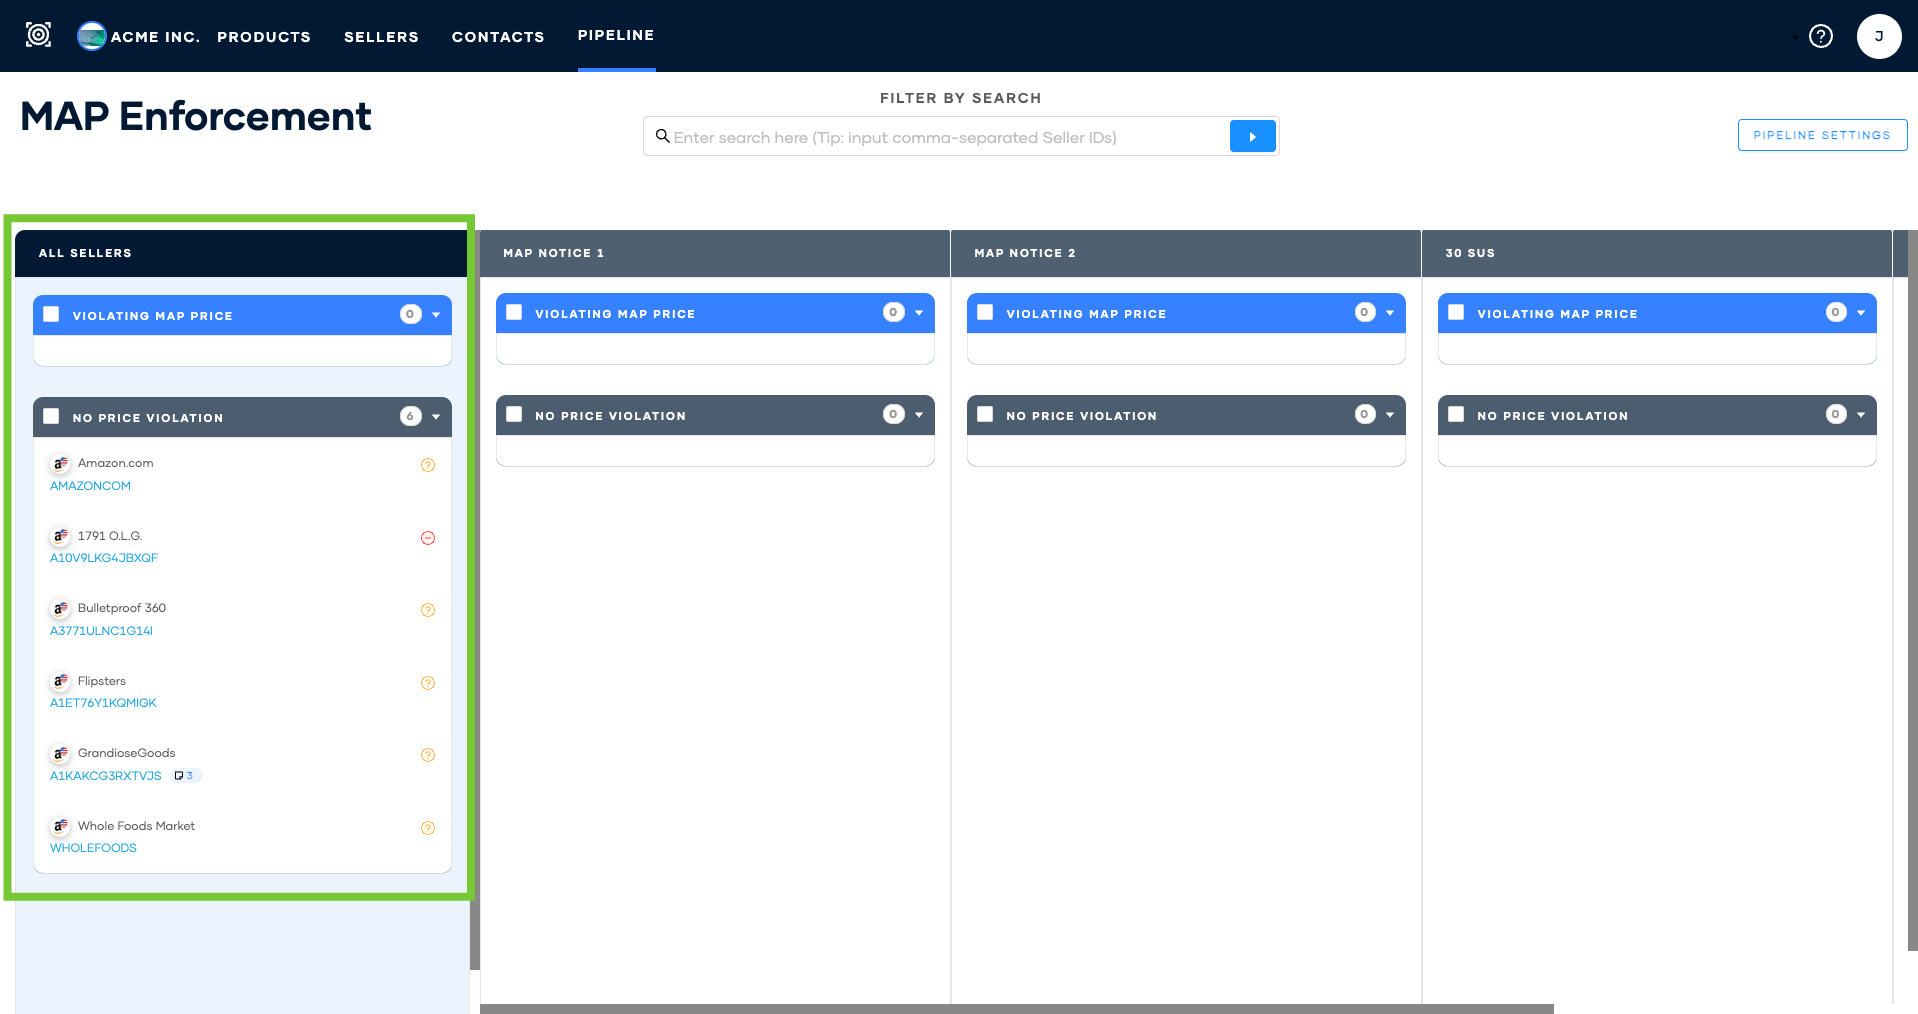
Manage sellers with MAP violation
In the All Sellers action, drag and drop sellers into the desired stages.
Tick the box beside Active/Inactive to select all sellers underneath. This will open the bulk actions menu where you can:
Move stage
Jump to different pages
Export
Add shared notes
Set/reset expiration